Set the canvas sizes

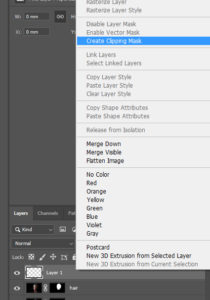
One of the first task is setting canvas sizes. If you have  several pre-set canvas sizes, you don’t need waste your time to set a new canvas size every time.

How can you set the canvas size ? It is easy.

  1.  Go to ‘File’ and choose ‘New’
  2. You get the popup of  ‘New document’. Then click the icon  of upper right side
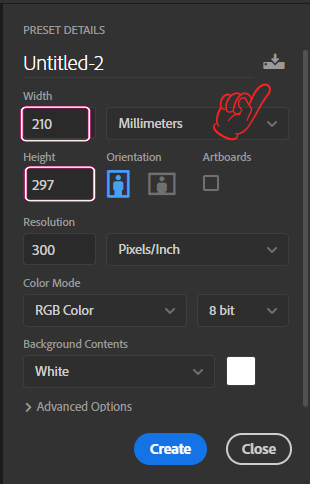
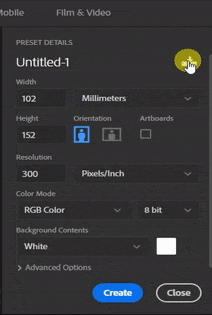
  3. Write the name of canvas, width and height.  You do not need to touch other sections.( The resolution is 300 pixel/inch, RGB 8 bit etc)
  4. Click ‘Save’

Sizes of Canvas for photos in Japan are as follows:

  • L  89*127mm
  • Square 89*89mm
  • D-KG 102*135 mm
  • KG 102*152mm
  • 2L 127*178mm
  • 6   203*254mm
  • A4  210*297mm
  • 4   254*305mm
  • 4W  254*365mm
  • A3   305*420mm

You ‘d better set all canvas sizes above before you start your jobs

Useful Shortcuts

Brush Size & Hardness ; [Alt] + Right Click

If you drag right and left,you can change the size of brush. If you drag up and down, you can change the hardness of brush. 

Merge All Visible Layers to a New Layer; [Ctrl] + [Alt] + [Shift] + [ E ]

You can merge all visible parts as a new layer by this shortcut.

Mask View; [Alt] + Click Layer Mask

After choosing the ‘Layer Mask’, you can check the Mask’s condition. When you use the same shortcut again, you can go back to the original view.

Drag-Zoom; [Ctrl] + [Space] + Drag

You can zoom-in and zoom-out by this shortcut.

Invert Colors of Selected Layer; [Ctrl] + [ I ]

This shortcut is useful especially when you want to inverse the layer mask.

Merge Selections;[Ctrl]  + [Shift]+ Click Layer Mask

Sometimes we need to merge 2 or 3 selections to a selection. If so, choose the mask and use this shortcut. Arrow becomes ‘+’mark and click (not drag, just click) another mask with push [Ctrl]  + [Shift].  You can see that 2 selections are merged.

Select;[Ctrl]+Click Mask  / Deselect;[Ctrl]  + [D]

Very easy and you will use this shortcut often .

Transform; [Ctrl]+[T]

You will also use this shortcut often when you want to change the size and the angle.  

Clone Stamp Tool

‘Clone Stamp’ is very useful. You can delete something that is not supposed to be shown or you can add something that is missing .

If you use ‘Clone Stamp’, you had better prepare to use ‘Clone Source Panel’.  It is contained in ‘Window’.

When you use ‘Clone Stamp tool’, create a new layer and use stamp on this layer. Do NOT use this on the original layer. If you use stamp on the original layer, you can not go back to the image before adding stamp.

Tip of color adjustment

There are some pictures which color are biased. 

For example, the image is too red.

In such case, we can use ‘Curves’. ‘Curves’ is often used as adding brightness, but ‘Curves’ is also used in another unique way.

Add ‘Curves’ on the image at first.

Click the icon which shows ‘Sample in image to set white point’. And Click the point which should be white  in the image. By this action the point which should be white becomes white.

Not only the white point, there are also the black point and the grey point.

The old woman in the image wears the clothes of Black and White. So I can use the Black point in this image too. 

Black becomes more Black.

Next image is also biased to blue. After adding ‘Curves’, I get more natural color image. I use her hair for the black point and for her clothes white line as the white point.

Cut out the body

Cutting out the body is simple. You don’t need to worry about this topic. Just use ‘Pen tool

There are a few points you should not forget.

  • After creating the path, ‘Save’ it.
  • From the ‘Path’, you can create the selection by one click. Click the botton ‘Load path as a selection’
  • After making the selection, add ‘Feather’.

I like 3 – 1 ‘Feather’. Why add this? Because if you don’t add ‘Feather’, the edge becomes too sharp and it will not fit with the background.

Basic skill of cut out hair

Quick Selection tool‘ and ‘Select and Mask‘ is basic for cut the model’s hair naturally.

In this above movie, We can change the background of the model by using this skills.

  1.  Choose the model’s layer
  2. Choose Quick selection tool in the left tool box
  3. Select the hair of the model roughly by Quick Selection tool
  4. Go to ‘Select ‘ and ‘Select and Mask
  5. You will get the specific window of Select and Mask. Choose ‘Refine Edge Brush tool‘ in the left column and move the brush along with the edge of hair.
  6. Choose ‘New layer with Layer Mask‘ for ‘outout to’ selection.

Until now, almost good but there are some problems. See the below image. This is a part of her hair. We can see some background blue color in her brown hair.

This is because the selection is not perfect. Choose the layer mask of the model’s layer and click and push Alt key at the same time. We can see the black and white image of the layer mask. Black means no information and White means the information.Black part has no information, so we can see the background from here. 

So What we can do for it is paint white color.

  1. Choose white brush and paint

Cut out the difficult hair

If the contrast between hair and the background is strong, cutting out hair is easy. Just use ‘Quick selection tool’ and ‘Select and Mask’ like this page.

But the typical image between hair and background is more vague.

How about this image?  

This old woman’s right side hair is difficult to see. If you try cut out her hair by ‘Quick Selection tool’, you will get the image like below.

Look at the image above. The right side hair is apparently bad. So what should we do?

One way is using other parts of hair instead. In this case, use the left side of her hair that is more clear for the right side.

I explain step by step.

At first, create the selection of her hair by clicking the layer mask with ‘Ctrl’ .

Go to ‘Select’ and choose ‘Transform Selection’

Now you got the selection of her hair. And you can transform this selection freely. For example, choose ‘Flip Horizontal’.

You can move the selection. Then choose ‘White brush’, and ‘Pint’ inside the selection.If you mimic this process several times, you will get better image like below.

Delete the extra color of the edge

In the image above, the edge of model’s face has the extra color which I want to delete. If you use ‘Clipping Mask’, you can do it.

Create new empty layer on the model’s layer and choose ‘Create Clipping Mask’

The upper layer ( Layer 1) only affects the layer below. If below layer has layer mask, the above layer will be limited within the layer mask area.

Choose ‘Clone Stamp tool’.

‘Clone Stamp’ the skin and move along the edge. You can see how the extra color is deleted.

Transform Selection

This smiling woman’s top hair is not seen in  this image. But we can add the hair on top.

  1. Cutting out hair and body. It is easy because the image is clear and it has strong contrast.

2.Create  a new layer on the model’s layer and make a selection of her hair. After you can select her hair, go to ‘Select > Transform Selection’.

3. Transform Selection to make new hair on her top.

4. Choose ‘Clone Stamp’, copy her hair to top

Watch the process in GIF

Swap a head to another body

In this page, I try to combine 2 images into one. A young man’s head with an old man’s body.

First, I need to make a head part and a body part.

I make a head part at first. Use ‘Pen tool’ for his face shape and use ‘Quick Selection tool’ for his head (check this page). Don’t forget to addFeather’ to the selection of his face.

Second, make a body part from the old man’s image, like the above.

Leave his neck (Do not erase) by just hiding his neck by layer mask because his neck may be useful when you combine with other people’s head.

Next, let’s combine two parts into one. The order of layers is very important. In this case, the body’s layer must be above the head’s layer.

If you put these layers in the correct order, you will see like this image below. 

Compare this image with the original his body to avoid to have either too big head or too small head. People are very sensitive to the balance of body.

Now I need more part of his neck as there is a gap between the head and the body.  In this case, I use ‘Clone Stamp tool’.

To use ‘Clone Stamp tool’, add a new layer between the body layer and the head layer.

Then use ‘Clone Stamp tool’ on the new layer to cover the gap between the body and the head.

Next, use ‘Liquify’ in ‘Filter’ to change the shape of collar.

Next page, I tell you the different skill to combine.